Saturday, July 14, 2012

Seven ways to communicate depth in 3D graphics

This video from YouTube shows a molecule visualization I created this morning, using a little application I have been working on.  I'm using this as an excuse to pontificate about my philosophy of 3D visualization today.

Much of my work centers around creating computer software for visualizing various three-dimensional objects.  These applications run on computers with two-dimensional displays; so there is a problem with conveying information in that third (depth) dimension.  The human brain is hard-wired to convert two dimensional visual information into an internal three-dimensional representation of a scene.  We can leverage this specialized hardware to convey a sense of depth using only a two dimensional screen.

You might assume that I believe stereo 3D to be the best way to convey depth information.  But you'd be wrong.  I am an evangelist for stereoscopic visualization.  I love stereo 3D displays.  But there are at least four other 3D visualization techniques that are more important than stereo.  You must nail those four before you even think about stereo 3D.  Below I have summarized my list of seven ways to enhance the perception of depth in 3D computer applications.

Without further ado; the list.  In order of most important to least important:
  1. Occlusion  

    Occlusion is the most important cue for communicating depth (Not "ambient occlusion", that's a kind of shading, technique #2). Occlusion means that you cannot see an object when it is behind another object.  It's that simple.  But displaying occlusion correctly is the most important part of conveying depth in computer graphics.  In my caffeine video, atoms in the front occlude the atoms behind them.  Fortunately, almost nobody gets this wrong; because everyone recognizes that it looks terrible when it is done wrong.  OpenGL has always used a z-buffer to manage occlusion, so most 3D applications get occlusion right.  Another approach, used by side-scrolling video games, is the "painters algorithm" (draw the stuff in back first) to give a sense of depth by occlusion.

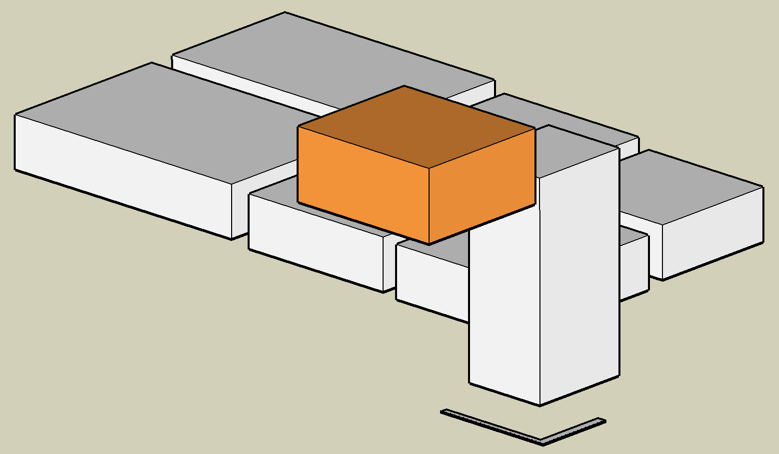
    Occlusion tells me that the orange thing is in front of the other things.

    One interesting display technique that does not respect occlusion, is volume rendering by maximum intensity projection.  Although volume rendering is difficult to do well, the maximum intensity projection method yields a robust rendering of brightness and detail   But the image looks the same whether viewed front-to-back or back-to-front.  I know from experience that this can be confusing.  But the advantages of the maximum intensity projection can sometimes make this tradeoff worthwhile.

  2. Shading

    By shading, I mean all of the realistic colors, gradations, shadows and highlights seen on objects in the real world.  Shading is so important, that when some folks say "3D graphics", all they mean is fancy shading.  This is one area that has been steadily evolving in computer graphics. My caffeine video uses a primitive (by modern standards) Lambertian shading model for the spheres, with a single point light source.  The Lambertian model is sufficient to convey depth and roundness, but looks rather fake compared to state-of-the art rendering.  Part of my excruciating jealousy of QuteMol comes from the clever shading techniques they have used.  For this reason I plan to continue to improve the shading methods in my application.

    Just look at the beautiful shading possible with QuteMol. I'm so jealous:

  3. Perspective 

    Perspective, what artists call foreshortening, is the visual effect that objects close to you appear larger than objects far away from you.  In my caffeine video, nearby atoms appear larger than distant atoms, especially when the molecule is close to the camera.  This is one area where my worship of QuteMol breaks down.  QuteMol appears to use orthographic projection, not perspective.  Close atoms are rendered the same size as distant ones.  But it took me a long time to notice, because QuteMol's beautiful shading is otherwise so effective at communicating depth.
  4. Motion parallax

    There are several ways that motion can reveal depth information by showing parallax, in which closer objects appear more displaced than more distant objects.  When an object rotates or moves, parallax effects reveal important depth information.  In my caffeine video, the rotations of the molecule help to convey the sense of depth.

    Many 3D visualization applications use mouse dragging to rotate the scene.  Users are constantly rotating the scene with the mouse while trying to examine the objects.  These users crave motion parallax.  In response, I have been experimenting with automated subtle wiggling of the scene so the user might not need to constantly drag the mouse.  But I am not sure I have nailed the solution yet.

    Another important source of parallax is when the viewer moves. This is the basis of head tracking in 3D graphics.  Every time I give a stereoscopic 3D demo, the first thing the viewer does after putting on the 3D glasses is to move her head from side to side; because that is the natural response to wanting to maximize the perception of depth.  But it doesn't work; because my applications do not do head tracking (yet).  Motion parallax is more important than stereoscopic 3D.

    The video below from 2007 is a famous example of the effectiveness of head tracking for conveying depth.
  5. Stereoscopy 

    Your left and right eyes see slightly different views of a scene, and your brain can use these two images to perceive your distance from the objects you see.  This is static parallax, as opposed to motion parallax (described in the previous section).  Done properly, stereoscopic viewing can complete the sense of depth in a scene.  But there are a lot of ways to get it wrong.  That is why stereoscopic display must be approached with extreme care.  My caffeine video uses YouTube's awesome stereoscopic support to display the molecule in stereo 3D.  I like viewing it with my Nvidia 3D vision glasses (requires a special 120Hz monitor); though for some reason the aspect ratio is wrong in this mode.   The other 3D modes seem to work fine though.  Part of what I enjoy about stereo 3D is that there are so many details that must be done correctly;  I like details.
  6. Fog 

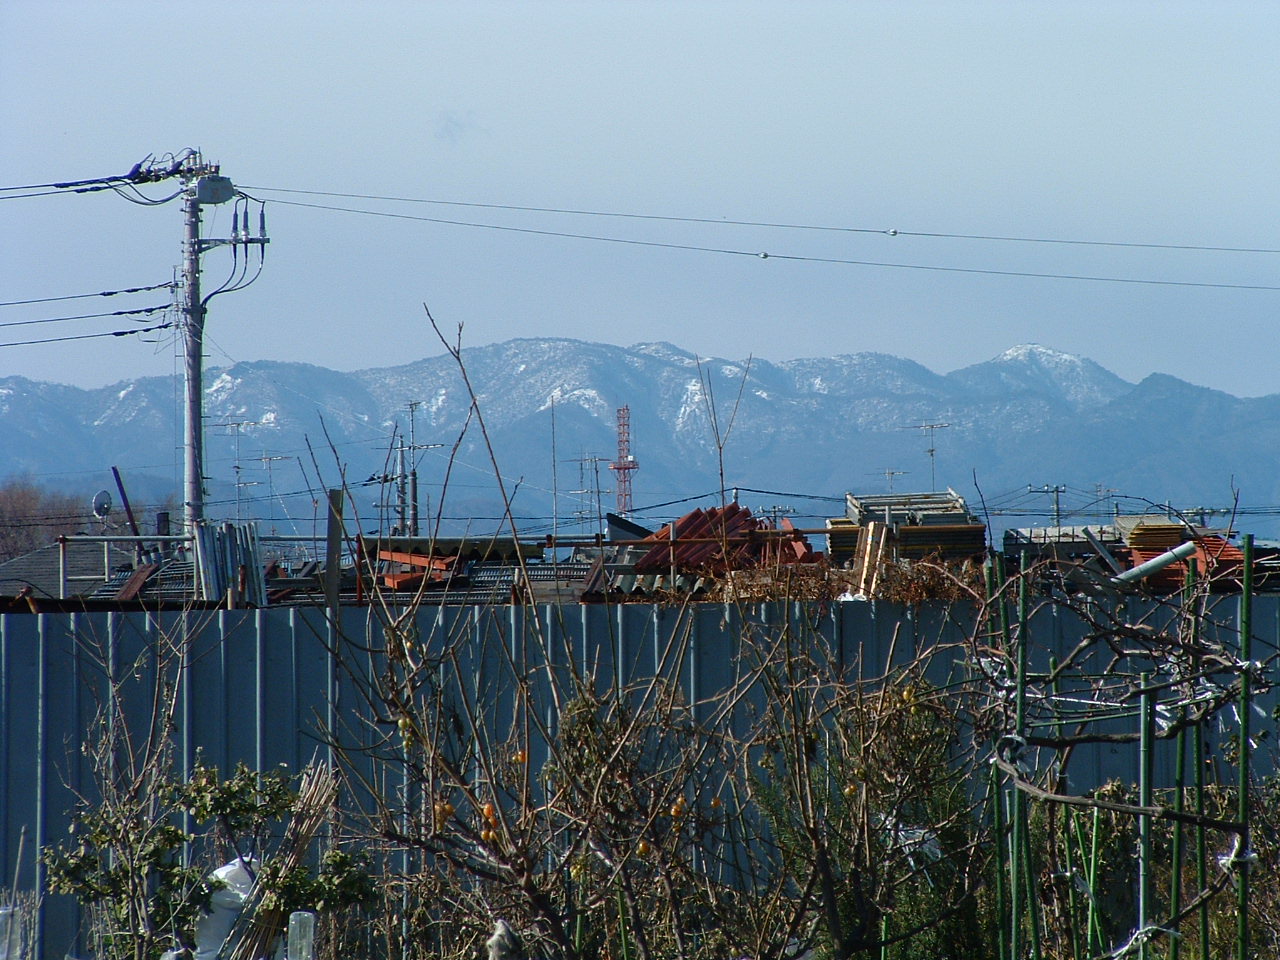
    When you see a mountain on the horizon far away, it appears much paler and bluer than it does close up.  That distant mountain can be almost indistinguishable from the color of sky behind it.  The more distant an object is, the closer its color becomes to the color of the sky.  Even on a clear day, for extremely distant objects, like far off mountains, what I am calling "fog" has an important effect.  On a foggy day, the same thing occurs on a vastly smaller scale.  In either case, that change in color is an important cue about the distance of an object.  In computer graphics, fog (or depth cueing) is easy to compute and has been used for ages, especially when other 3D effects were too hard to achieve. My molecule viewing application uses fog, but at a low setting, and might not be visible in my caffeine video.  Fog is especially important as objects approach the rear clipping plane, to avoid "pop ups", the sudden appearance or disappearance of objects.  It is more pleasing if the objects disappear by gradually receding into the fog.
  7. Depth of field

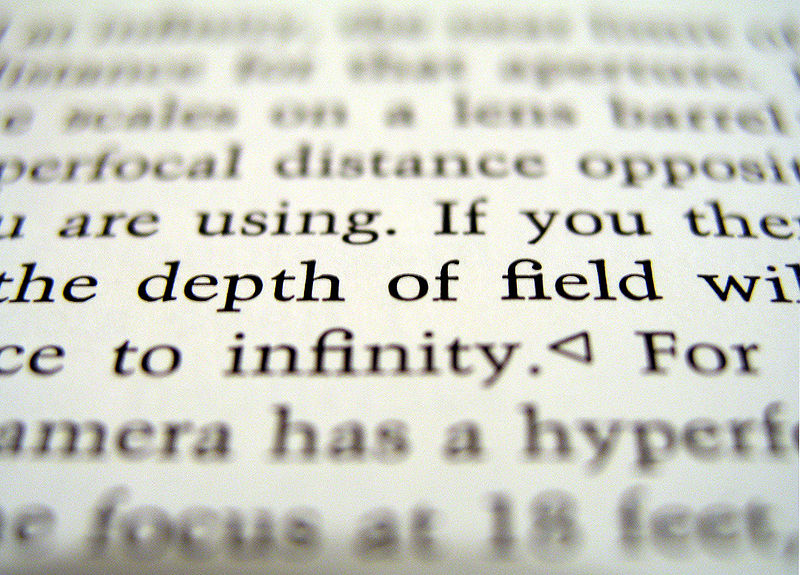
    When you photograph a scene using a wide aperture lens, the focal point of your scene may be in sharp focus, but other objects that are either much closer to the camera or much farther away appear blurry.  This blurriness is a cue that those other objects are not at the same distance as the focal point.  This depth cue can also convey a false sense of scale in trick photography.  An aerial city scene with an extremely narrow depth of field can appear to be just a tiny model of a city.  Depth of field is not widely used in interactive computer graphics, because it is expensive to compute, it's a subtle effect, and to really do it properly, the focused part of the image should follow the user's gaze.  Not just head tracking; but eye tracking would be required.  Even the Hollywood movies make only light use of depth of field; in part because it is not possible to be certain where the audience's gaze is directed.

Most of the techniques I know of can be assigned to one of those seven categories. Have I missed any other depth conveying techniques?   Comments are welcome below.

Sunday, July 08, 2012

Sphere imposters in OpenGL shading language


I recently started a hobby project to create a little OpenGL viewing application. I am experimenting with custom shaders to create sphere imposters. It's working pretty well. Here is a caffeine molecule.

Each sphere uses only two triangles; compared with the thousands of triangles that would be needed to get similar smoothness with the classic OpenGL pipeline.

This week I implemented the custom shaders and various stereoscopic viewing options.  Next I intend to implement interpolated fly-through movie making, and then upload a 3D video to YouTube.

I should also work on measuring and improving performance like I did with my earlier sphere rendering project.  Performance is sluggish when I try to view a protein with thousands of atoms.  But there is a lot of room for improvement.

Four of the five sphere below use the fixed-function OpenGL pipeline, and have hundreds of polygons each.  One sphere has two triangles and uses my shaders.  Can you tell which one?

My inspiration for this sphere imposter project was QuteMol.  I am a long way from achieving what those guys did.  But I am proud of what I have done so far anyway.

Sunday, February 05, 2012

Measuring performance of immediate mode sphere rendering

In my previous post we created a simple hello world OpenGL application. Now we move one step closer to my goal by actually rendering some spheres. And measuring rendering performance.


This program draws a bunch of spheres in immediate rendering mode. This is the slowest possible way of doing it. But it is also the simplest to program and requires the least indirection. If the performance of this approach would meet my needs, I would be happy to use it. But it does not meet my needs. I ideally want the following:
  1. Render over 10000 spheres at once
  2. In under 30 milliseconds
  3. With the most realistic rendering available

It is clear that immediate mode rendering, which is horribly old fashioned, will not come close to meeting these criteria. Let's see how far off we are from the goal.

In this experiment we vary the number of spheres shown, and the number of polygons used to define each sphere. The number of polygons is determined by the second and third arguments to glutSolidSphere(). I set both arguments to the same resolution value, either 10 (spheres look OK, but there are obvious artifacts when zoomed in) or 50 (almost as good as a tesselated sphere can look). And I also varied the number of spheres shown.

Here are the results (click to embiggen):


At each resolution the rendering time is proportional to the number of spheres drawn, as you might expect. At the lower resolution of 10 layers-per-dimension, the rendering time is about 70 microseconds per sphere. At the higher resolution of 50, the rendering time is about 315 microseconds per sphere. To meet my desired performance criteria, the performance would need to be about 0.3 microseconds (300 nanoseconds) per sphere. So we need about a 100-fold speed up from the higher quality rendering to satisfy my needs here.

But there are many approaches ahead. More next time.

The data:

method # spheres resolution frame rate
immediate 1 10 0.3 ms
immediate 1 50 0.4 ms
immediate 3 10 0.4 ms
immediate 3 50 1.1 ms
immediate 10 10 0.9 ms
immediate 10 50 3.4 ms
immediate 30 10 2.1 ms
immediate 30 50 8.9 ms
immediate 100 10 6.8 ms
immediate 100 50 29.0 ms
immediate 300 10 20.1 ms
immediate 300 50 92.3 ms
immediate 1000 10 69.8 ms
immediate 1000 50 315.1 ms

Here is the full source code for the program to run this test:


#!/usr/bin/python

# File sphere_test.py
# Investigate performance of various OpenGL sphere rendering techniques
# Requires python modules PySide and PyOpenGL

from PySide.QtGui import QMainWindow, QApplication
from PySide.QtOpenGL import QGLWidget
from PySide.QtCore import *
from PySide import QtCore
from OpenGL.GL import *
from OpenGL.GLUT import *
from OpenGL.GLU import *
from random import random
from math import sin, cos
import sys


class SphereTestApp(QApplication):
"Simple application for testing OpenGL rendering"
def __init__(self):
QApplication.__init__(self, sys.argv)
self.setApplicationName("SphereTest")
self.main_window = QMainWindow()
self.gl_widget = SphereTestGLWidget()
self.main_window.setCentralWidget(self.gl_widget)
self.main_window.resize(1024, 768)
self.main_window.show()
sys.exit(self.exec_()) # Start Qt main loop


# This "override" technique is a strictly optional code-sanity-checking
# mechanism that I like to use.
def override(interface_class):
"""
Method to implement Java-like derived class method override annotation.
Courtesy of mkorpela's answer at
http://stackoverflow.com/questions/1167617/in-python-how-do-i-indicate-im-overriding-a-method
"""
def override(method):
assert(method.__name__ in dir(interface_class))
return method
return override


class SphereTestGLWidget(QGLWidget):
"Rectangular canvas for rendering spheres"
def __init__(self, parent = None):
QGLWidget.__init__(self, parent)
self.y_rot = 0.0
# units are nanometers
self.view_distance = 15.0
self.stopwatch = QTime()
self.frame_times = []
self.param_generator = enumerate_sphere_resolution_and_number()
(r, n) = self.param_generator.next()
self.set_number_of_spheres(n)
self.sphere_resolution = r

def set_number_of_spheres(self, n):
self.number_of_spheres = n
self.sphere_positions = SpherePositions(self.number_of_spheres)

def update_projection_matrix(self):
"update projection matrix, especially when aspect ratio changes"
glPushAttrib(GL_TRANSFORM_BIT) # remember current GL_MATRIX_MODE
glMatrixMode(GL_PROJECTION)
glLoadIdentity()
gluPerspective(40.0, # aperture angle in degrees
self.width()/float(self.height()), # aspect
self.view_distance/5.0, # near
self.view_distance * 3.0) # far
glPopAttrib() # restore GL_MATRIX_MODE

@override(QGLWidget)
def initializeGL(self):
"runs once, after OpenGL context is created"
glEnable(GL_DEPTH_TEST)
glClearColor(1,1,1,0) # white background
glShadeModel(GL_SMOOTH)
glEnable(GL_COLOR_MATERIAL)
glMaterialfv(GL_FRONT, GL_SPECULAR, [1.0, 1.0, 1.0, 1.0])
glMaterialfv(GL_FRONT, GL_SHININESS, [50.0])
glLightfv(GL_LIGHT0, GL_POSITION, [1.0, 1.0, 1.0, 0.0])
glLightfv(GL_LIGHT0, GL_DIFFUSE, [1.0, 1.0, 1.0, 1.0])
glLightfv(GL_LIGHT0, GL_SPECULAR, [1.0, 1.0, 1.0, 1.0])
glLightModelfv(GL_LIGHT_MODEL_AMBIENT, [1.0, 1.0, 1.0, 0.0])
glEnable(GL_LIGHTING)
glEnable(GL_LIGHT0)
self.update_projection_matrix()
gluLookAt(0, 0, -self.view_distance, # camera
0, 0, 0, # focus
0, 1, 0) # up vector
# Start animation
timer = QTimer(self)
timer.setInterval(10)
timer.setSingleShot(False)
timer.timeout.connect(self.rotate_view_a_bit)
timer.start()
self.stopwatch.restart()
print "RENDER_MODE\tSPHERES\tRES\tFRAME_RATE"

@override(QGLWidget)
def resizeGL(self, w, h):
"runs every time the window changes size"
glViewport(0, 0, w, h)
self.update_projection_matrix()

@override(QGLWidget)
def paintGL(self):
"runs every time an image update is needed"
self.stopwatch.restart()
glClear(GL_COLOR_BUFFER_BIT | GL_DEPTH_BUFFER_BIT)
glColor3f(255.0/300, 160.0/300, 46.0/300) # set object color
self.paint_immediate_spheres(self.sphere_resolution)
self.frame_times.append(self.stopwatch.elapsed())
# Report on frame rate after enough frames have been rendered
if 200 <= len(self.frame_times):
n = len(self.frame_times)
total = 0.0
for t in self.frame_times:
total += t
mean = total / n
print "immediate\t%d\t%d\t%.1f ms" % (self.number_of_spheres, self.sphere_resolution, mean)
# print "mean frame time = %f milliseconds" % (mean)
# Reset state
self.frame_times = [] # Reset list of frame times
try:
(r, n) = self.param_generator.next()
self.set_number_of_spheres(n)
self.sphere_resolution = r
except StopIteration:
exit(0)
# self.set_number_of_spheres(self.number_of_spheres * 2)
self.stopwatch.restart()

def paint_immediate_spheres(self, resolution):
glMatrixMode(GL_MODELVIEW)
for pos in self.sphere_positions:
glPushMatrix()
glTranslatef(pos.x, pos.y, pos.z)
glColor3f(pos.color[0], pos.color[1], pos.color[2])
glutSolidSphere(pos.radius, resolution, resolution)
glPopMatrix()

def paint_teapot(self):
glPushAttrib(GL_POLYGON_BIT) # remember current GL_FRONT_FACE indictor
glFrontFace(GL_CW) # teapot polygon vertex order is opposite to modern convention
glutSolidTeapot(2.0) # thank you GLUT tool kit
glPopAttrib() # restore GL_FRONT_FACE

@QtCore.Slot(float)
def rotate_view_a_bit(self):
self.y_rot += 0.005
x = self.view_distance * sin(self.y_rot)
z = -self.view_distance * cos(self.y_rot)
glMatrixMode(GL_MODELVIEW)
glLoadIdentity()
gluLookAt(x, 0, z, # camera
0, 0, 0, # focus
0, 1, 0) # up vector
self.update()


class SpherePosition():
"Simple python container for sphere information"
pass


class SpherePositions(list):
"Collection of SpherePosition objects"
def __init__(self, sphere_num):
for s in range(sphere_num):
pos = SpherePosition()
# units are nanometers
pos.x = random() * 10.0 - 5.0
pos.y = random() * 10.0 - 5.0
pos.z = random() * 10.0 - 5.0
pos.color = [0.2, 0.3, 1.0]
pos.radius = 0.16
self.append(pos)
assert(len(self) == sphere_num)


def enumerate_sphere_resolution_and_number():
for n in [1, 3, 10, 30, 100, 300, 1000]:
for r in [10, 50]:
yield [r, n]


# Automatically execute if run as program, but not if loaded as a module
if __name__ == "__main__":
SphereTestApp()

Proof of concept OpenGL program in python and Qt/PySide

Here is the output of my initial test program:


I am planning to test the performance of various ways of rendering lots of spheres using OpenGL. I will use python and Qt to run the tests. As a first step, I have created a very light hello program that renders the classic Utah teapot.


#!/usr/bin/python

# File teapot_test.py
# "hello world" type rendering of the classic Utah teapot
# Requires python modules PySide and PyOpenGL

from PySide.QtGui import QMainWindow, QApplication
from PySide.QtOpenGL import QGLWidget
from OpenGL.GL import *
from OpenGL.GLUT import *
from OpenGL.GLU import *
import sys


def override(interface_class):
"""
Method to implement Java-like derived class method override annotation.
Courtesy of mkorpela's answer at
http://stackoverflow.com/questions/1167617/in-python-how-do-i-indicate-im-overriding-a-method
"""
def override(method):
assert(method.__name__ in dir(interface_class))
return method
return override


class SphereTestGLWidget(QGLWidget):
"GUI rectangle that displays a teapot"
@override(QGLWidget)
def initializeGL(self):
"runs once, after OpenGL context is created"
glEnable(GL_DEPTH_TEST)
glClearColor(1,1,1,0) # white background
glShadeModel(GL_SMOOTH)
glEnable(GL_COLOR_MATERIAL)
glMaterialfv(GL_FRONT, GL_SPECULAR, [1.0, 1.0, 1.0, 1.0])
glMaterialfv(GL_FRONT, GL_SHININESS, [50.0])
glLightfv(GL_LIGHT0, GL_POSITION, [1.0, 1.0, 1.0, 0.0])
glLightfv(GL_LIGHT0, GL_DIFFUSE, [1.0, 1.0, 1.0, 1.0])
glLightfv(GL_LIGHT0, GL_SPECULAR, [1.0, 1.0, 1.0, 1.0])
glLightModelfv(GL_LIGHT_MODEL_AMBIENT, [1.0, 1.0, 1.0, 0.0])
glEnable(GL_LIGHTING)
glEnable(GL_LIGHT0)
self.orientCamera()
gluLookAt(0, 0, -10, # camera
0, 0, 0, # focus
0, 1, 0) # up vector

@override(QGLWidget)
def paintGL(self):
"runs every time an image update is needed"
glClear(GL_COLOR_BUFFER_BIT | GL_DEPTH_BUFFER_BIT)
self.paintTeapot()

@override(QGLWidget)
def resizeGL(self, w, h):
"runs every time the window changes size"
glViewport(0, 0, w, h)
self.orientCamera()

def orientCamera(self):
"update projection matrix, especially when aspect ratio changes"
glPushAttrib(GL_TRANSFORM_BIT) # remember current GL_MATRIX_MODE
glMatrixMode(GL_PROJECTION)
glLoadIdentity()
gluPerspective (60.0, self.width()/float(self.height()), 1.0, 10.0)
glPopAttrib() # restore GL_MATRIX_MODE

def paintTeapot(self):
glPushAttrib(GL_POLYGON_BIT) # remember current GL_FRONT_FACE indictor
glFrontFace(GL_CW) # teapot polygon vertex order is opposite to modern convention
glColor3f(0.2,0.2,0.5) # paint it blue
glutSolidTeapot(3.0) # thank you GLUT tool kit
glPopAttrib() # restore GL_FRONT_FACE


class SphereTestApp(QApplication):
"Simple application for testing OpenGL rendering"
def __init__(self):
QApplication.__init__(self, sys.argv)
self.setApplicationName("SphereTest")
self.mainWindow = QMainWindow()
self.gl_widget = SphereTestGLWidget()
self.mainWindow.setCentralWidget(self.gl_widget)
self.mainWindow.resize(1024, 768)
self.mainWindow.show()
sys.exit(self.exec_()) # Start Qt main loop


if __name__ == "__main__":
SphereTestApp()